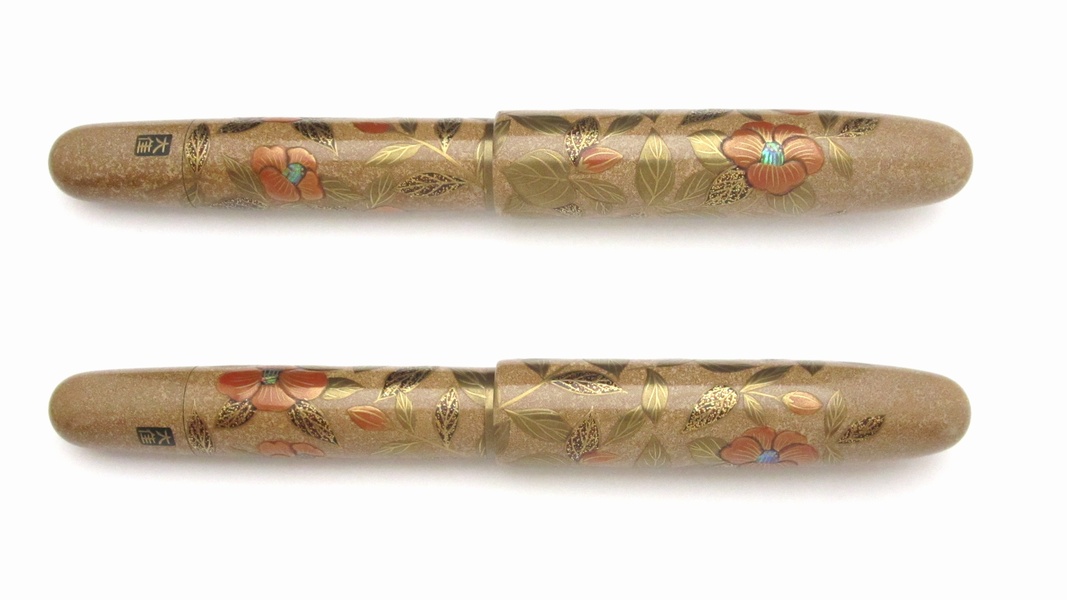
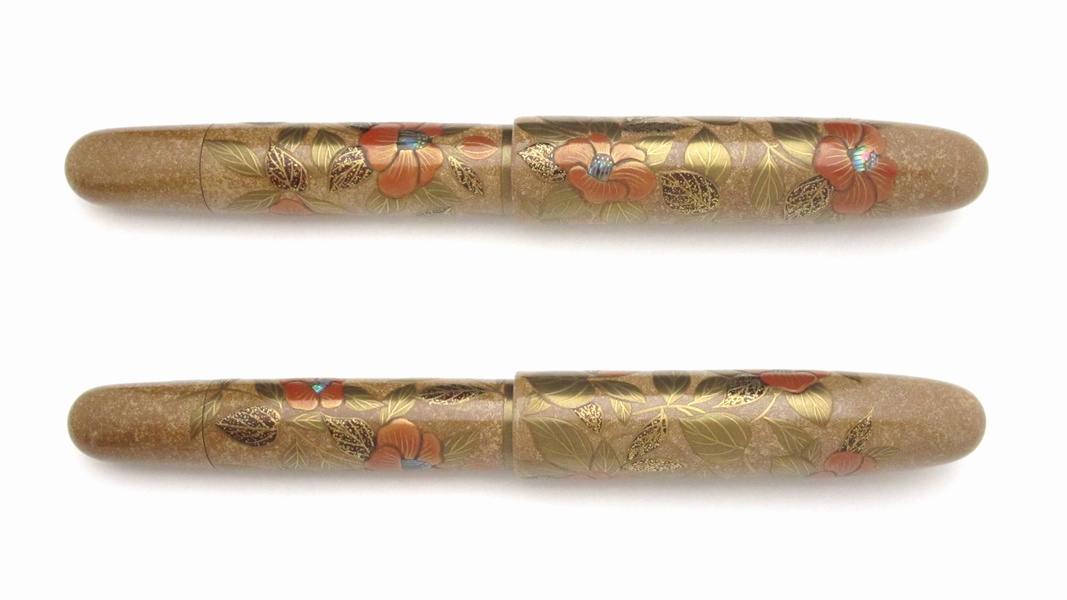
AGJ Original Maki-e Fountain pen #24 "Camellia" Namiki Urushi Emperor size Sparkling Togidashi Taka Maki-e Kyoto Japan Wa


AGJ Original Maki-e Fountain pen #24 "Camellia" Namiki Urushi Emperor size Sparkling Togidashi Taka Maki-e Kyoto Japan Wa
Please contact us from here for the price.
Item Description

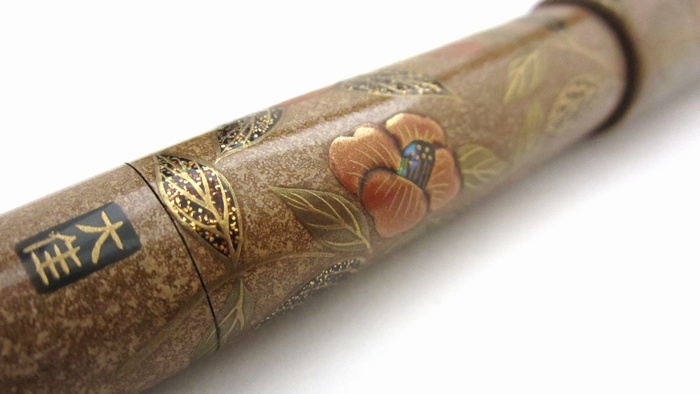
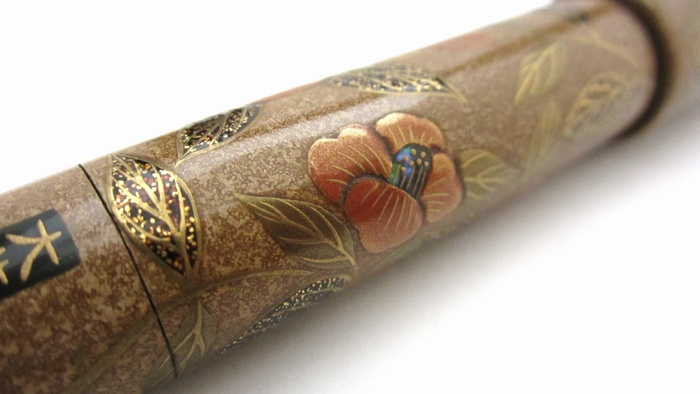


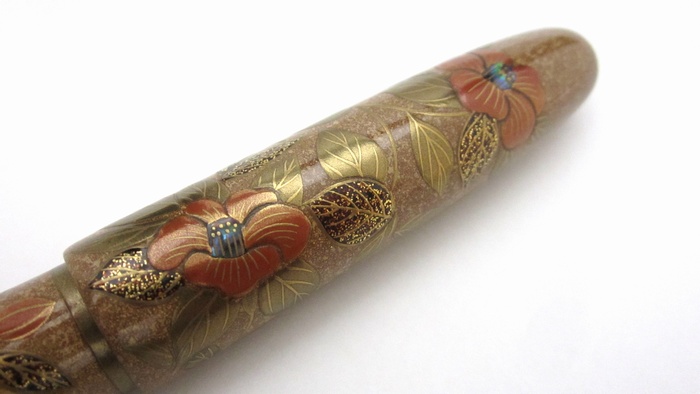
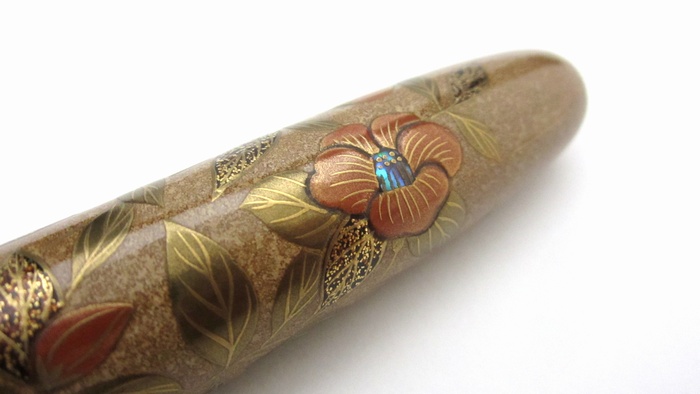


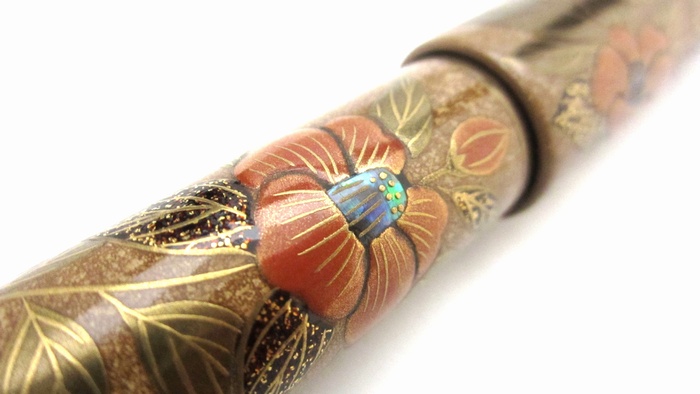
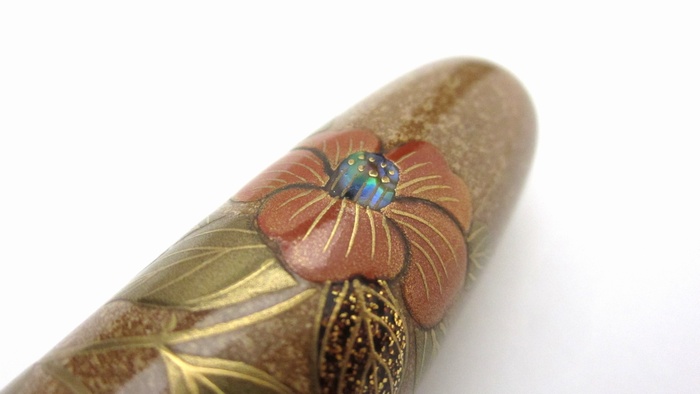

This Authentic Goods from Japan's Original Maki-e Fountain pen is made by famous Kyoto Maki-e Artisan "Daikai".
This pen is only one in the world. You can not find it anywhere.
Kyoto Maki-e is the best known Maki-e technique in Japan.
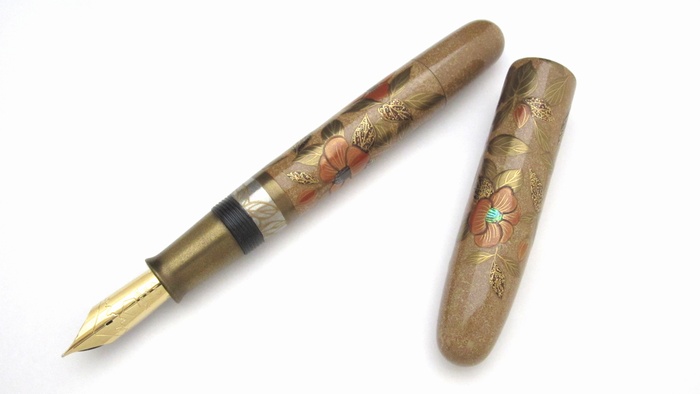
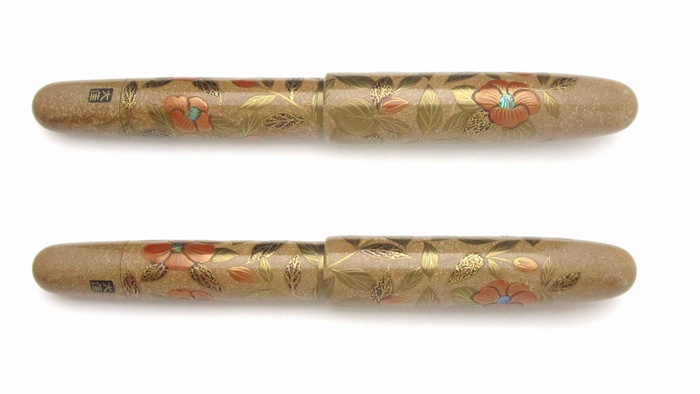
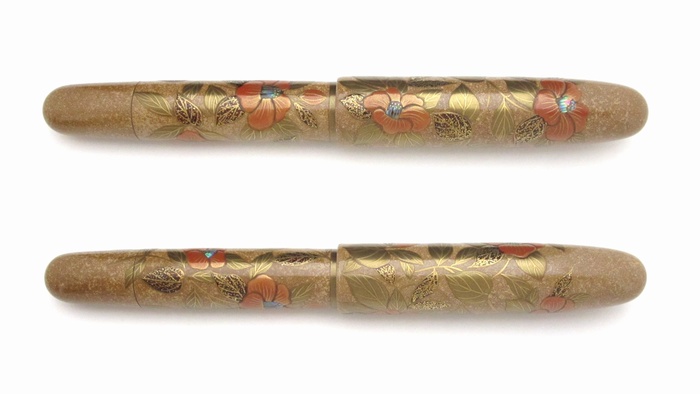
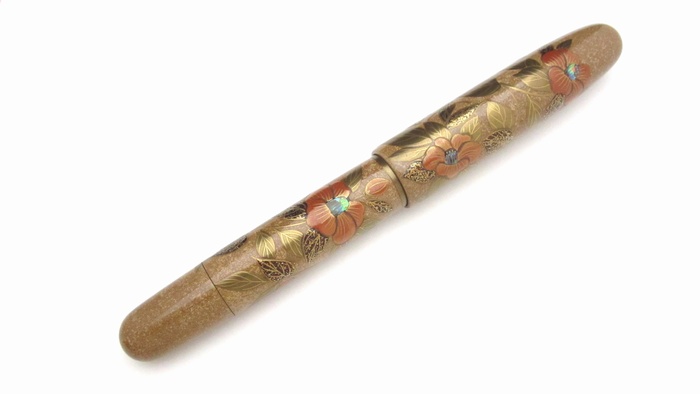
This is original maki-e fountain pen based on Namiki Urushi Emperor size Black.
This pen is only one in the world. You can not find it anywhere.
Kyoto Maki-e is the best known Maki-e technique in Japan.
This is original maki-e fountain pen based on Namiki Urushi Emperor size Black.
Camellias are evergreen trees native to Japan. They flower from winter to spring. Camellia motifs are often used on artworks as Japanese traditional patterns.
[Description]
| Name: | Camellia #24 (Namiki Emperor size Original) |
| Maki-e Artist: | DAIKAI |
| Technique: | Togidashi Taka Maki-e |
| Origin: | Kyoto, Japan |
| Nib: | 18K Gold |
| Nib size: | Medium |
| Size: | 20mm(Dia.) x 175mm |
| Shipping: | FREE SHIPPING! |
| Others: | With the pen stand |
Custom engraving service on AGJ's original Maki-e fountain pens is available for those who wish.
|
[Techniques used for Camellia]
Technique: Togidashi Taka Maki-e (Makie), Raden
Production period: Takes 3 to 4 months to finish decorating one fountain pen. It takes at least one week to dry one layer.
The Production Process:
- Bengara (iron oxide) lacquer is painted on all over the fountain pen as adhesive
- Coarse lacquer powder (in order to create the volume. The details are explained below) will be sprinkled over it
- After it gets dry, white lacquer is painted and layered (several times: polish each time after painting) until the surface gets smooth (Polish the surface with water and charcoal so it may get even)
- Polish it
- Lacquer is coated on all over the fountain pen and let it dry
- Polish it further to make it lustrous
(although it looks brown currently, the colour will change from brown to ivory over time)
- White lacquer is painted and layered on the glass repeatedly in order to create a volume of lacquer
- Remove the layered lacquer in water
- Let it dry
- Crush it and powderise it(reduce to powder)
- Give the fountain pen a volume by painting Bengara lacquer on the brown base part
- Sprinkle silver powders, let it dry and polish it in order to give it a volume
- Raised lacquer (mixture of black lacquer and Bengara lacquer) is applied (raised)
- Let it dry and polish it
- Genuine gold powder No.9 is sprinkled
- After it gets dry, coat it with red lacquer
- Polish it
- Raden. Mexican shells are used (as Mexican shells are very lustrous, they are used to emphasise some parts of the product)
- The leaves are drawn with coloured lacquer over Bengara lacquer and then sprinkle No. 2 gold flakes(Hirame).
- Coat them with Nashi-ji lacquer (transparent lacquer).
- Polish them afterwards.
- The deep brown parts are the colour of the Bengara lacquer base
- Draw the leaf veins with Bengara lacquer over Shukin (Red & Gold)
- Gold powders are sprinkled over the drawing
- Coat it with lacquer after it gets dry and let it dry again
- Polish it so the gold part may get more lustrous
- Raise the leaf parts with silver
- Paint and coat them with lacquer 2 to 3 times
- Polish them
- Paint with Bengara lacquer
- Sprinkle gold powder No.6
- Coat gold powder with a mixture of black lacquer (to darken the product), Uwazuri (Raw) lacquer (to make it lustrous) and Nashiji-lacquer (to create the volume)
- Shine it well after it is polished
- After the process 7 above is completed, draw the contour and the leaf vein with Bengara lacquer and then sprinkle gold powder No.1 using Hira (Flat) Maki-e technique.
- After coating repeatedly with white lacquer, sprinkle gold powder using Hira (Flat) Maki-e technique. Polish it after coating it with lacquer.
(below the trim ring and the closest part to the barrel)
- After coating repeatedly with white lacquer, sprinkle coarse gold powder and polish it.
(the closest to the nib)
- Coat it repeatedly with white lacquer
- Sprinkle silver powder
- Polish it
- Sprinkle gold powder using Hira (Flat) Makie technique
- Coat it with lacquer
- Polish it
- After the process 6 above is completed, draw the leaves with Bengara lacquer
- Sprinkle gold powder No. 1
- Set the gold powder by coating.
- Polish it to make it lustrous after it gets dry
[DAIKAI's Career]
| Year 1950 | Born in Kyoto His father, uncle, grand father and grand-grand father were Urushi Lacquer masters too. |
| 1969 | Another Urushi artist "Masakichi Shima" started teaching Daikai. |
| 1976 | Daikai began succeeding to inherit the style of Kyoto Makie (Maki-e). |
| 1985 | Won the Kyoto Chamber of Commerce Award at Kyoto Lacquerware exhibition. |
| 1986 | Held Urushi Lacquer exhibition at Kyoto Takashimaya (the largest department store in Japan). |
| 1990 | Exhibited at the Arts and Crafts in kyoto. |
| 1991 | Became a technical lecturer for the artists at the traditional industry at Kyoto. |
| 1994 | Opened his Kyoto Urushi lacquer school. |
| 1995 | Invited to display his works at INFA 1995 in Hannover, Germany. |
| 1997 | Won the award at the industrial techniques for the crafts in Kyoto. |
| 1999 | Held the first Kyoto Urushi lacquer school’s exhibition at Ko-dai temple, Kyoto. |
| 2001 | He has held the traditional crafts exhibition every year since 2001. |
| 2008 | Held Amber Maki-e and Lacquer works exhibition at Sogo department store. |
| 2009 | Held Kyoto Urushi Lacquer exhibition at Takashimaya in Namba, Osaka. |
He lives in Kyoto now and teaches many Maki-e artisans Kyoto-Makie technique. |